For More Information Call:
866-395-5440
- Johnny Thompson – Sales
- Darian Yawn – Support
- Mark Books – Geospatial Services
- Claire Hillmeyer – Client Success
Installers: Installers for ArcGIS Desktop can be found on the ESRI Customer Care Portal under My Organizations > Downloads. You will need to log in using your ESRI account.
Instructions for installing ArcGIS Desktop and activating your single-use license:
You are now authorized for use.
Description: The LMSS EZ-Plot toolbar is a simple but powerful plot allocator/cruise plot generator for ArcGIS Desktop. Select the polygons where you need plots and then enter your desired grid parameters. It really is that easy! Grid points can be output to a shapefile or feature class and then converted to SoloForest waypoint format. Click here for a full description and functionality list.
Compatibility: Works with all builds of ArcGIS Desktop (ArcMap) 10.0 – 10.8.x and Windows 7 - 11. ArcGIS Pro version coming soon!
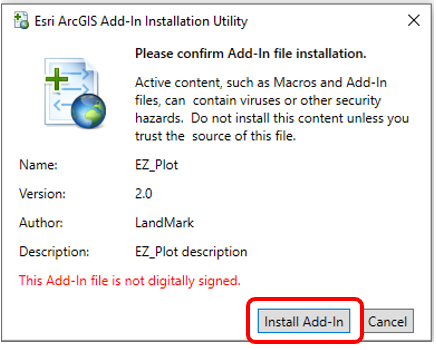
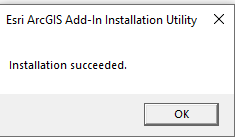
Install Procedures:
EZ-Plot Tutorials/User Guide: LMSS_EZ Plot Manual.pdf
Description: The LMSS EZ-Plot toolbar for ArcGIS Pro is a simple but powerful cruise plot allocator for ArcGIS Pro. Select the polygons where you need plots and then enter your desired grid parameters or have EZ Plot read the grid parameters from your Stands Polygon attribute table. It really is that easy! Grid points can be output to shapefile or geodatabase feature class. Plots can also be converted to SOLO Forest waypoint format.
Compatibility: Works with all builds of ArcGIS Pro 3.x and newer.
Install and Licensing Procedures:
You'll receive an email response from LandMark Support usually within one business day with a license key code and the EZ Plot for ArcGIS Pro Add-In file.
 Enter the License Key from the LandMark Support email in the License Key field and click Authorize button. When completed, click the back button to return to the map screen.
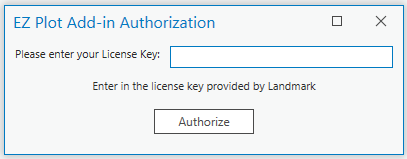
 For simple plot allocation, select polygon features for plot allocation and click the Plot Layout Tool. Adjust grid parameters starting at the top of the dialog window and work down.
  Waypoint Convertor Tool is useful for plot conversion to SOLO Forest waypoint format (.way).
 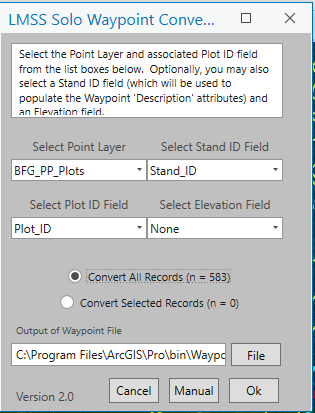 Import Stand ID's tool can be used to import Stand Attributes into the Plot points that are inside each stand polygon.
 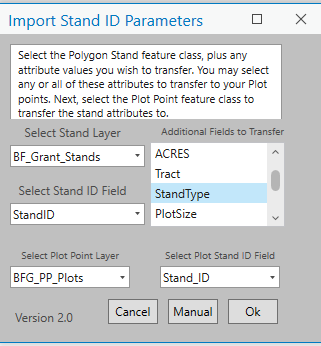 See the EZ Plot for ArcGIS Pro videos on the www.LandMarkHelp.com > Support > Video webpage for demonstrations of the functionality.
SilvAssist for ArcGIS Desktop is no longer supported.
F4 Tech ended support, development, and bug fixes on all versions of SilvAssist for ArcGIS Desktop several years ago. If you have purchased a SilvAssist you may continue to use it but be aware that future Windows or ArcGIS updates could break it.
LMSS has worked to duplicate most of the reporting functionality of SilvAssist within TCruise Desktop by way of the Excel reporting module. Plot allocation functionality has also been replicated in our EZ Plot toolbar for ArcGIS.
Contact us for more info.
Description: SOLO Forest from Trimble Forestry is the mobile GIS mapping software designed specifically for forestry applications. Easily collect point, line, and polygon features, load shapefile or aerial base maps, generate cruise grids in the field, and more! GPS data from SOLO can be exported directly from the handheld device in shapefile format and imported into most desktop GIS applications. SOLO can also be integrated with TCruise for a very powerful forest inventory data collection solution. More info on SOLO can be found here.
Compatibility: SOLO Forest is compatible with handheld devices running Windows Mobile 5.0 – 6.5 or PocketPC 2003. (See the installer section below for recommended installers for various handheld models.) There is also a version for Windows tablets running Windows 7, 8, or 10.
Install and Update Procedures:
SOLO Forest Installers: See install instructions above.
Registration procedures:
Handheld Software Registration Code Request Form
License transfer instructions:
Trimble does allow users to transfer SOLO Forest licenses. Each SOLO license purchased allows the owner to use and register the software on one device. Users will need to uninstall SOLO Forest from their old device before the program can be registered on the new device. Please contact LandMark Support at 866-395-5440 x2 so we can assist you and submit the request for license transfer.
SOLO Forest Feature Files – sample feature files (feature lists) for GPS data collection:
SOLO Forest Custom Zone files – allows SOLO to work with custom coordinate systems such as Albers and Mississippi Transverse Mercator (MSTM).
User Guide:
More manuals and instructional materials in the Manuals section.
Description: SOLO Office FE (Forestry Edition) is an optional desktop companion for SOLO Forest. This program is primarily designed for project managers who need to create complex projects to deploy to field users with SOLO Forest
Key Features include:
SOLO Office must be purchased separately and requires a separate registration.
Compatibility – SOLO Office FE is compatible with Windows XP, Vista, Windows 7, 8, and 10.
Installer: SOLO Office FE 4.2.0.9 Install.msi – Download the install file to your PC and double-click to install.
Registration procedures:
Desktop Software Registration Code Request Form
User Guide: SOLO Office FE User Guide 4.2.0.9.pdf
Description: TCruise Desktop Pro is a full-featured forest inventory software solution developed by Worldwide Heuristic Solutions. The program can utilize the most common inventory sampling methods and report in a variety of volume units. TCruise comes with nearly 500 internal volume functions and can also accommodate user-defined volume tables and equations. There are various reporting modules the program can feed via database export. TCruise can also be customized by the developer to meet individual customer needs for special reporting, exports, or processing. Users may update older versions of TCruise Desktop to the latest version at no charge. It is recommended that the mobile (field) version of TCruise be updated at the same time as the Desktop version to prevent compatibility issues. Updating TCruise for Mobile Devices is also free for existing users and will not require re-registration.
Compatibility: Compatible with all Windows operating systems from Windows 7 - Windows 11.
TCruise Desktop Install and Update Procedures:
1. Download the latest installer by right clicking on this link: TCruise Desktop Pro and choose Save Link as… or Save Target As… Choose the Downloads folder on your PC as the destination. If a security application attempts to prevent this installer from downloading, simply click the Allow Download or Keep option.
2. Run the installer file named TCruiseSetup.exe. You may need admin privileges to install this application. The install wizard should guide you thru the install process. The first prompt will be to accept the terms and conditions. Choose Next, I accept the license agreement, Next, Next, etc. and then Finish to complete the install.
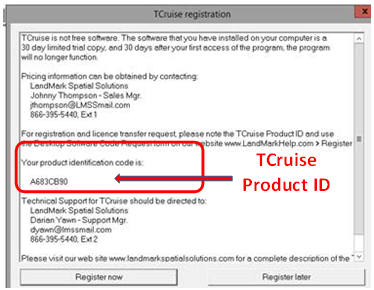
3. Register TCruise - New installs and of TCruise will require registration as will transfers of the software to a new PC. Each PC will need a unique set of registration and keys codes based on the TCruise Product Identification Code; you cannot re-use codes generated for another PC.
TCruise Pro Optional Modules - $300/module/user
1. Pro toolbar with the following functions:
2. Excel-based reporting - 20+ Excel worksheets with a variety of standard report types and tables for analysis or for joining to GIS layers. To implement the new reports, users will need to make a few minor updates to their existing templates and TCD files. Detailed instructions for these updates are here.
User Guides: See the manuals section of our website.
Sample TCruise Templates: The templates below should be good starting points for creating your own custom template. Note that you will probably need to edit the cruise method, species, products, and merch specs to make them useful for your local area. Save the desired files to your My Documents > TCruisePC folder on your PC. Call for assistance or read through the Templates section of our online manual in the Manuals section of your website.
Sample Cruise Data: The sample data sets below can help users practice processing cruises. Follow the instructions in the document link below.
Description: TCruiseMobile is the field version of TCruise.
Compatibility: Compatible with all Windows Mobile operating systems including Windows CE, Pocket PC, and Windows Mobile 5.0 -6.5. The Tablet version is compatible with Juniper Systems Mesa Tablet running Windows 10 or 11. Other Windows tablets may be compatible but have not been tested.
TCruise Mobile Install and Update Procedures:
1. Download the appropriate installer:
2. Register TCruise:
User Guide: See TCruise manual in the manuals section of our website.
Sales and support of the LandMark Custom Reports for TCruise have been discontinued due to compatibility issues with newer versions of Microsoft Office and Windows 10 security. The enhanced reporting functionality is now handled in the TCruise Excel Standard Reports which should be used as a replacement.
Description: The Haglof Management Systems/Timber Cruise Suite is a data management, licensing, and reporting application based on a Microsoft SQL Server platform. A flash drive with a license file is included with purchase so users can easily install and use the application on multiple PC’s as long as the flash drive is inserted. Most users will benefit from the enhanced Crystal reporting module for TCruise. There is even a map module for users who only need a basic GIS Mapping application.
Compatibility: Compatible with all Windows operating systems from Windows 7 -11.
Installers: see the HMS Install Procedures link below for specific install procedures for each of these applications.
HMS Initial Setup: HMS Install Guide:HMS Timber Cruise Suite Install Procedures.pdf
HMS TCruise Suite Initial Setup
User Guide: HMS Timber Cruise Suite User Guide
RTI for SOLO Forest
Description: RTI for SOLO Forest allows interaction and data transfer in the field with TCruise WinCE. These custom scripts push StratumID, PlotID, and location to the TCruise Plot Info screen and also records how the plot was visited for security purposes. Other features allow users to randomly audit visited plots and create new plots to substitute for ones that could not be visited.
Compatibility: Compatible with all Windows Mobile operating systems including Windows CE, Pocket PC, and Windows Mobile 5.0 -6.5.
Installers:
Install and registration instructions: Connect your handheld to your PC via Windows Mobile Device Center and run the installer from the link above. You will be prompted to register by entering a Reg and Keycode. Contact LandMark Support by phone, email, or using the Software Code Request form and provide the RTI Product ID displayed on the registration screen.
RTI for ArcPad
Description: RTI for ArcPad allows users to share data with TCruise WinCE in the field. The custom ArcPad RTI toolbar allows users to pick plots to navigate to and transfers location, Stratum ID, PlotID, location, time on plot, and plot status once the plot is visited.
Compatibility: Compatible with Windows Mobile operating systems 5.0 -6.5. Users must have ArcPad 10.0 Build 55 pre-installed on their handheld and on the desktop PC.
Installers and Setup Instructions: ArcPad_and_RTI Install_Package.zip Save the zipped file to your PC, extract and then open the enclosed file named 1_ArcPad RTI Installation and Registration Guide.pdf for detailed instructions.
Description: Terrain Navigator Pro (TNP) is powerful and easy to use desktop and mobile mapping software that contains high-resolution scans of USGS topographic maps, current aerial photographs, street layer, and even private parcel data as an option. These maps and photos can be customized with labels, marks, symbols, lines, routes, tracks, area fills, GIS data sets, and notes. Once you have finished designing your custom maps, use the built-in printing and publishing to create digital and paper prints with text, logos, inset maps, legends, etc. Layers, maps, and photos can be exported for use in SOLO Forest or other mobile GIS applications.
There is also a TNP mobile app that allows users to collect markers, tracks, and geo-stamped photos in the field, and then sync all the GPS data into the Terrain Navigator Pro office software. Click here for more details or call us at 866-395-5440 for a demo and pricing information.
Compatibility: Windows 7-11 for Desktop application and iOS and Android smartphones for Mobile app.
Installer: TNP installers and datasets are shipped directly to users.
Description: Windows Mobile Device Center (WMDC) is the utility used to connect Windows Handheld devices to PC’s for data transfer. In spite of what you might read online about Microsoft not supporting this application any longer, it does still work for most users using the procedures below.
Windows Mobile Device Center install Procedures:
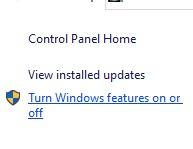
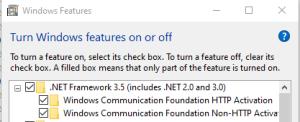
1. Enable .NET 3.5 Framework on the PC.

2. Download Windows Mobile Device Center Helper and Windows Mobile Device Center.
3. Run the install files:
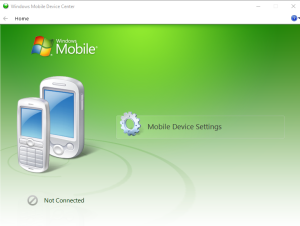
4. Connect the handheld via the USB cable. Allow about one minute to see if the device will connect. Always choose Connect without setting up device. From there you can explore the device and copy files back and forth form device to PC.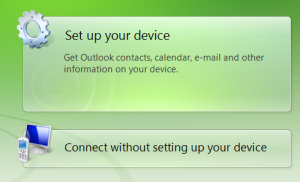
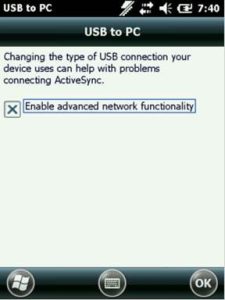
If your device will not connect, disconnect the cable from the mobile device and close Windows Mobile Device Center. Try these steps:
Alternative ways to transfer data to your PC:

